Reviewing some basic level tutorials for the Raspberry Pi this weekend, and specifically around GPIO inputs and bash scripting (and scheduling) in order to review whether I can put an on/off button somewhere and how to auto schedule jobs to run at reboot.
Running through Core Electronics Chapter 2 workshop (see Resources list below) has been right up this alley around the GPIO inputs, specifically lessons 2.2 and 2.4.
A couple of points I learnt.
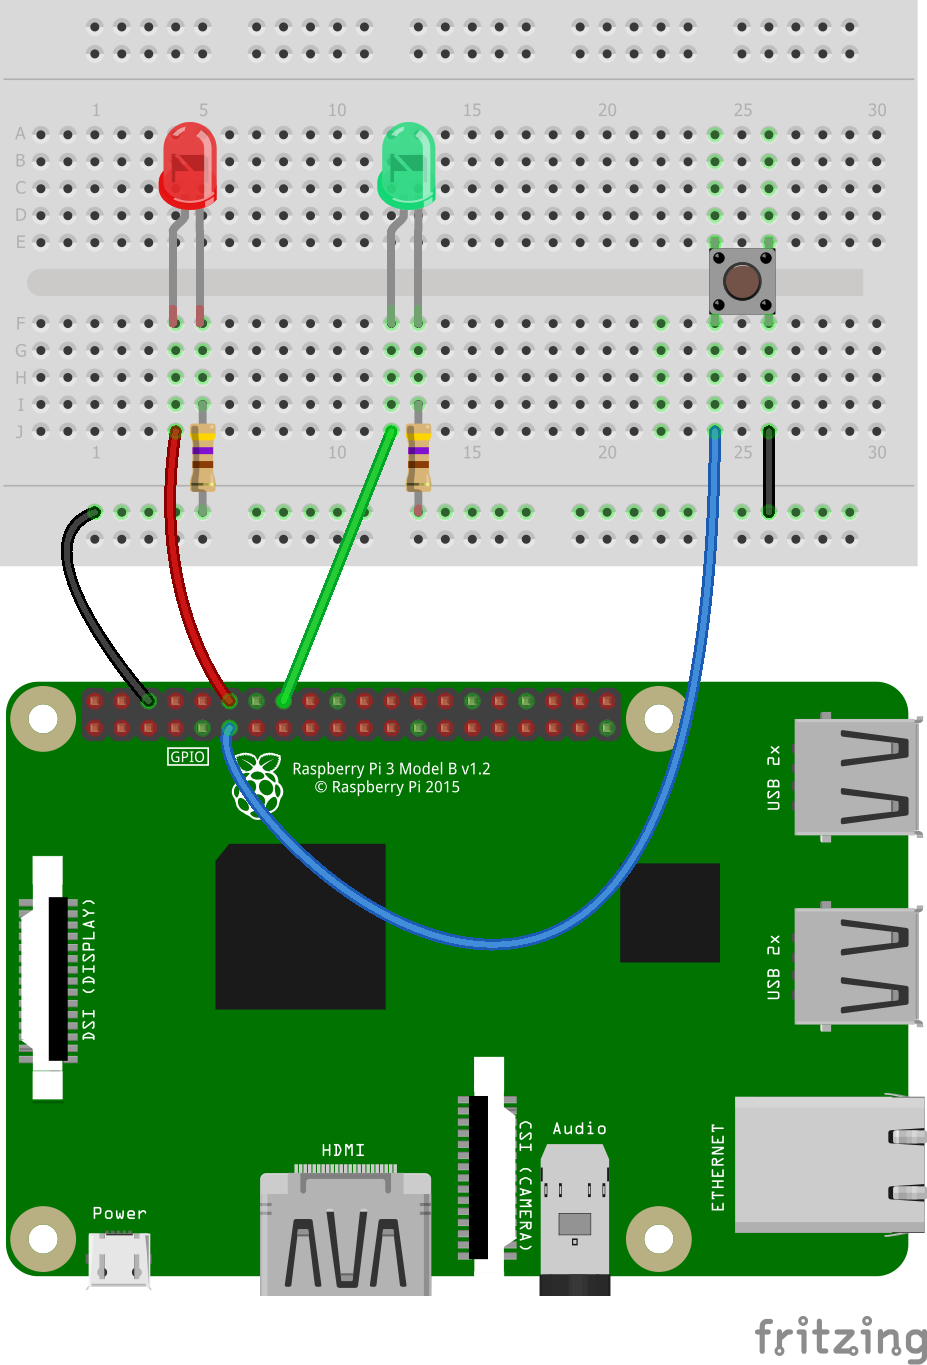
When looking at a circuit diagram like this:
Running through Core Electronics Chapter 2 workshop (see Resources list below) has been right up this alley around the GPIO inputs, specifically lessons 2.2 and 2.4.
A couple of points I learnt.
When looking at a circuit diagram like this:
- It does matter what way the LEDs are placed into the breadboard - the funny leg on the left means the longer leg when it comes to an actual LED.
- Even if someone is asking on youtube about how power is provided, and you are asking the same question as it's not working properly (see above), it doesn't mean that the circuit is wrong - check the circuit again :)
- If you don't check your circuit as in point 2, you may be tempted to connect the ground to power instead to see if it works - 5v is unnecessarily high, 3.3v will work - but it won't fix the overall problem of point 1.
- This website is a good resource for understanding what GPIO numbers in both BCM and board formats are
- There seem to be two schools of thought around wiring and whether you should shutdown/unplug your RPi before wiring - currently I'm working on the better safe than sorry school of thought and shutting it down a far bit to ensure I don't short it out.
 |
| Red Light |
 |
| Now with added Green light, through the magic of a button |
Links:
https://www.youtube.com/watch?v=x8kRK0DIIF8 - Intro to GPIO using LEDs and a button
https://www.youtube.com/watch?v=8ixG-4sDfss - Continued Intro to GPIO with a "breathing" LED
https://www.youtube.com/watch?v=8ixG-4sDfss - Continued Intro to GPIO with a "breathing" LED
Resources:
- A breadboard
- 2x LEDs
- 2x 470 Ohm Resistors
- a momentary button
- hookup wire / Male-Female jumper wires
Comments
Post a Comment